Email. According to a McKinsey study, on average we spend 2.25 hours (or 28%) of each day on email. The average person receives/sends 105 emails a day.
2.25 hours a day equates to 45 hours per month. On email. In one year, you’ll spend 540 hours or 22.5 days on email.
Shocking, isn’t it? Ready to get even crazier?
Let’s crunch some more numbers using common averages. A person who generally begins working in the professional world after college is 22 years old. If this person were to retire at age 60 and never look at email again (which won’t happen), that would be 38 years working. That’s 20,520 hours on email. 855 days on email.
2.34 years…on email
In the video below you’ll learn how to create an inbox that shows you only the most important emails. This strategy is the foundation of a system I created to make email as painless and effortless as possible.
If you follow the steps in this video and implement the rules I lay out, you’ll easily save up to 8 hours per week on email — getting at least 50% of your time back.
There’s a ton of content in the video, and I really want to make sure you’re able to implement it and see results right away So I went ahead and created a downloadable PDF summary guide for you to download and reference any time you like. It’s yours to keep, fo’ free.
You’ll also find the action items from the summary guide below.
Free Summary Guide
Here’s the download link: http://wilg.me/1jRQW86 — Right-click and select “save file as…”
Summary of Action Items
In this one video you learned how to:
- Create a customized, automated gmail inbox
- Correctly set up your priority inbox
- Create a to-do/action section
- Send mail from other non-Gmail accounts
- Check mail from POP3 accounts
- Use forwarding for automation
Create an Action Label
- Click/choose Create new label from the left-hand side menu
- Name it: Action, To Do, @, or any name you choose
Setting up your Effortless Priority Inbox
- Click the Gear (Settings) icon in the upper-right corner
- Choose the Inbox menu
- Inbox type: Priority Inbox
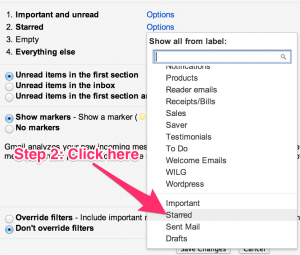
- Select Inbox Sections:
- Section #1: Important (not Important and unread)
- Section #2: All Starred
- Section #3: “Action” or “To Do” section (Action label created in previous step for this section)
- Section #4: Everything else
Send Mail As
- Do you have more than one email? Add them to your Gmail account and utilize the Send Mail As feature
- Send email from an alternate email address: @yahoo.com, @about.me, @[personal-domain], etc.
Check Mail from Other POP3 Accounts
- Receive emails all in one inbox
- Add your alternate POP3 email addresses and Gmail will check for messages and deliver them directly to your inbox
- Add a work email or email addresses from a personal domain
- Make sure to label the incoming messages so you can distinguish which address they were originally sent to
Forwarding
- Automatically forward emails based on pre-set filters
- Example: Evernote email address
- Bills/Receipts can be forwarded to Evernote and organized saved
- Save important business expenses, donations, tax-deductible items, etc.
Make sure you take action right away and implement what you learned from the video.
Most importantly, make sure you immediately start batching your email checking into sessions. Divide this out into three times per day and set a time on the calendar. If it’s not scheduled email time, do not open your email.
Using the new inbox setup you created, you’ll find it much easier to identify the important emails and focus only on those. Especially if you start eliminating and preventing spam and junk mail. Go spend your newfound free time working on more important things — or just enjoying life.
- –
Note from Arman: This content is just one module from the 11 inside my Effortless Email course on Udemy. Use this link to receive a special launch promo of 75% (use coupon code “wilg75” if you don’t automatically see the discount).
Photo credit: Business Girl — CC License